
Click here for our latest newsletter . Windows 11 upgrade is just around the corner, are you ready?
Social Security Numbers Leaked
 Recently, National Public Data, a company that aggregates data to provide background checks, has confirmed there was a massive data breach involving Social Security numbers and other personal data on millions of Americans.
2.9 billion records including names, addresses, birthdays and Social Security numbers were stolen.
If you want to read more about the breach, click here.
How to check if your data was stolen
Cybersecurity firm Pentester has obtained a copy of the stolen data and created a site where you can see if your data was stolen. The site asks for first and last name, state, and birth year. Don’t give out any more information than that.
Check if your information has been leaked here: https://npd.pentester.com
What to do if your data has been stolen
One thing you can do to protect yourself is to freeze your credit – don’t just monitor it. Go to each of the credit bureaus (Experian, Equifax, TransUnion), create accounts and freeze your credit. Refer to this website to learn how to freeze your credit. This is a free service. The credit bureaus will offer you other services for a fee but freezing your credit is free. That’s what we’ve done. You can also check your credit report and make sure you recognize all the types of credit you have.
It’s impossible to prevent breaches of this type from happening. They happen to all kinds of companies that have your information. You can protect the information you have control over. Contact us for more information about securing your accounts/devices.
World Backup Day
 If you think this sounds like a made up holiday, you’d be right. However, the sentiment behind it should not be ignored. If your data is important to you, you need to have multiple copies of it.
Ideally, you’d have a copy on the device (for example – a laptop), a local copy (for example – an external drive) and a copy in the cloud or offsite. Trust us, we’ve seen it happen too many times where a software or hardware problem causes total data loss. Backups are crucial in this situation.
We recommend several different systems for backup depending on your needs, whether you’re a home user who wants to protect photos or a business with important documents and records to keep safe.
World Backup Day Pledge
"I solemnly swear to backup my important documents and precious memories on March 31st. #WorldBackupDay”
I will also tell my friends and family about World Backup Day -
Real friends don’t let friends go without a backup. 🙂
Contact Us today and we can discuss what backup plan
is right for you!
Uptick in pop-up scams. Ignore them! They are fake. Here’s how to get rid of them.
|
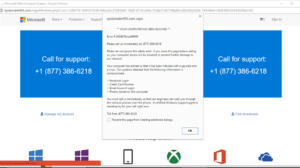
In the last few weeks, we have seen a noticeable increase in scams that use pop ups trying to convince you to call a phone number to “fix” a problem. The pop up may also use your speakers to tell you not to turn off your computer and to call the number on your screen. Do not call the number. This is a scam and anything these people say on the other end of the phone is a lie. Microsoft has commented about this on this webpage. Scroll about 3/4 of the way down to watch a video about these scams or click here. |
|
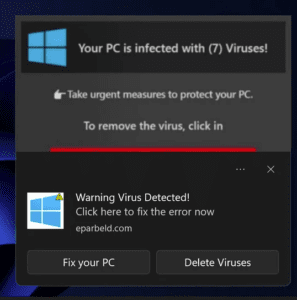
Also, we’ve had multiple people report pop-ups in the notification center located on the bottom right-hand corner of the screen, which usually look something like the photo below. Usually it will generate multiple pop-ups in a row and will keep doing it even if you close the ones that have opened. If this happens to you, do not click on the pop up. Instead, click on the 3 little dots to the left of the “X” and select “turn off notifications for (fill in program)”. Or call us but do not click on pop up or call the number listed.
The hallmark of these scams is the claim that your computer is compromised and you need to call Microsoft or Windows to fix the issue. Also important to note that Macs are not immune to these pop ups.
This is always a scam. Microsoft / Windows / Apple will never ask you to call them. These pop ups may also start speaking to you through your computer speakers. This is part of the scam designed to scare you. If you see a pop up like this, you may not be able to close it. The scam often claims to lock your computer or that turning off your computer will permanently damage it. This is a lie. The best thing for you to do is immediately turn off your computer completely. Press the power button and hold it down for 20 seconds to shut the computer down. If your computer is off, there is nothing a scammer can do to compromise it. Once your computer is off contact us via phone, email, or our website so we can give you advice about what to do next in your specific situation. Do not ever call a phone number from a pop up no matter how convincing it may seem. We have found that adding an adblocker to your browser can help prevent these pop ups. Contact us for quick and easy instructions to add an adblocker to your browser(s). https://mailchi.mp/75746236b8c9/how-to-identify-windows-pop-up-scams-15636577 |
The Basics of Staying Safe Online – Part 1: Passwords
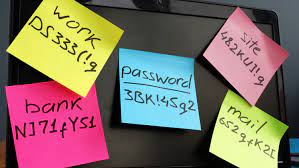 With passwords, we see everything – little pieces of paper, notes on phones, password books, and documents on computers called “Passwords.” The number one rule of password management is this: do not reuse passwords. Reusing passwords means that if a single account is breached, many of your other accounts are at risk of being compromised. However, managing all your passwords is a huge hassle and most people find it frustrating.
So, how do I create unique passwords that I will remember?
Put simply, you don’t need to remember them. Use a password manager to create and store unique passwords. You have to remember one password called the “master password.”
For password management, I use LastPass. I find it easy to use and inexpensive. You pay a small fee, install the LastPass app on your phone and a browser extension on your computer and your passwords are all there for you. LastPass can generate unique passwords of any length and save them in your account. You do incur a slightly higher risk with storing your passwords in the cloud but I feel the benefits outweigh the risks.
Passwords making you crazy? Give us a call at 610-733-6842 or fill out our contact form here.
*H/T to Douglas Muth – ideas taken from this article.
Backup, backup, backup
UPDATE: This post was updated on August 16, 2020.
How much is your data worth to you? If your hard drive crashed or if you lost your device – would losing the data upset you? Of course it would! You have pictures, emails, documents, music – your whole life is on that thing!
It’s not a question of “if” your hard drive will fail, it’s really a question of “when.” Hard drives are the most sensitive pieces of equipment on a computer. They are essentially floating platters that spin at high speeds with a head that moves back and forth over the platters. (UPDATE: This was written when spinning hard drives were all we had. Now we have solid state drives which are not spinning platters but when they fail, data is usually not recoverable except by an expensive data recovery company. All the more reason to have a reliable backup.)
BACKUP BASICS
- Have 2-3 copies of all your important data. One copy on your computer, one on an external drive, and one in the cloud.
- Ideally, one of your backups is not local. It is stored in another location in case of a problem in your home/office. Cloud backup services such as Carbonite are a perfect solution for off-site backup.
- Do not use CD/DVD’s as backup. They are not reliable in the long run and technology is moving away from these discs.
- Set up a backup plan that you will use! This doesn’t have to be hard.
- Not everything has to be backed up. Your 100 GB music collection can most likely be recreated if need be.
- Backup all your electronic devices – mobile devices as well as desktops/laptops.
- Backup regularly.
- Test restoring data to make sure backup is working.
TYPES OF BACKUP
- Local – This means using an external hard drive plugged into your computer or a NAS (Network Attached Storage) that plugs into your router and allow all computers on your network to use the drive for either backup or storage.
- Off-site – Your home or business could suffer some kind of damage that would render your computer and your external hard drive useless (think flood or fire.) Nowadays, off-site storage is the “cloud.” This is a great alternative for laptops since you don’t have to plug an external drive.
CLOUD STORAGE VS. CLOUD BACKUP
What I often hear is people saying “Oh, I use the iCloud/Dropbox/Google Drive, my data is backed up already.” There are significant differences between cloud storage and cloud backup. Free cloud storage applications are great for several things—organizing pictures by vacation, baby, or DIY project; sharing these memories with family and friends; allowing for easy access to these files across multiple devices. Read more about backup here.
What cloud storage applications should not be confused with is secure backup. Cloud storage applications do not provide comprehensive, automatic backup of all files on your computer. As such, the user is unable to set policies for data retention, including what’s backed up and how frequently. They’re also poor protection against one of the most common forms of data loss—user error and accidental deletion. If you delete something stored only on the cloud, it’s usually gone.
Examples of Cloud Storage:
- iCloud
- Google Drive
- Dropbox, Box, etc.
- One Drive
Examples of Cloud Backup:
- Carbonite
- Backblaze
- Crashplan
Some backup suggestions:
- Carbonite – For $60/year, get unlimited storage space in the cloud. Carbonite installs a program on your laptop or desktop that quietly runs in the background and keeps your computer backed up. Incredibly easy to set up and use. The first backup takes a long time but after that only changed data is backed up. Works with Windows or Macs.
- File History – Windows 10 has a built-in backup and restore program that works with your external hard drive.
- Time Machine – Mac OS X comes with a program that will automatically back up your data when you plug in an external hard drive. Time Machine saves multiple copies of your files so you can go back through versions to find a file you accidentally deleted.
What exactly is backed up with iCloud?
UPDATE: This page was updated on August 4, 2020.
I find a lot of people are confused with what iCloud is and what it does.
What is it?
iCloud is a cloud-based service by Apple. It works by syncing your data from your iPhone/iPad/Mac/Windows PC to your other devices signed in to the same Apple ID. Syncing means if you delete a photo on one device, it is deleted on all your devices. Apple gives you 5GB of storage free to sync your devices. If you run out of space, you can either delete some data or you can buy more storage from Apple. Prices are here. If you share an Apple ID with several members of your family, you are all sharing only 5GB of free storage. If everyone has their own Apple ID, they each get their own 5GB free.
iCloud is also a full backup of your iPhone/iPad. You can only restore this data by restoring the full backup over your iPhone/iPad.
What gets synced to iCloud and all your devices:
- Photos
- Desktop/Document folders
- Safari Bookmarks
- Calendars
- Notes
- Reminders
- Keychain passwords
What doesn’t get backed up from your Mac
- Downloads folder
- Video folder
When do iCloud backups happen from your iPhone/iPad?
- iCloud will backup your whole device over Wi-Fi every day if these conditions are met – a device is turned on, locked, and connected to a power source.
If you want to be extra safe (like me), turn on iCloud backup for your iPhone/iPad AND back up your computers by using Time Machine on a Mac and File History on a Windows computer. Do not rely on iCloud as your only “backup.”
Turn on Two Factor Authentication (2FA)
Turn on two factor authentication (also called Multi-Factor Authentication) on every account you own. Passwords are no longer safe “enough.” Online security breaches are happening all too often these days.
What is two factor authentication? It is securing your accounts with two levels of security. One level is the password and the next level is a code texted to your smartphone. This prevents someone who has a password from getting into an account. You probably already do this on various accounts that require it such as your bank and Apple ID. Some accounts like Gmail and Amazon offer 2FA but don’t require it. You should turn it on these accounts.
If you need help setting up 2FA/MFA, please contact us.
Coronavirus (COVID-19) Business Continuity Plan
As novel coronavirus (COVID-19) diagnoses continue to increase around our area and the world, Thames Computer Consulting is committed to providing a safe environment for our clients and ensuring business continuity, to the best of our abilities. We are confident that we can provide continuing service during this time.
Thank you for your continued trust in us.
We are currently taking the following measures of precaution:
We are implementing a remote only policy with a no contact drop off/pick up location for repairs that require hands on work.
We can remotely help you with any issue you have.
If you need to bring us your computer, we will arrange an appointment with you where you will leave your device in a protected area. For laptops, we will wipe down the keyboard and trackpad with alcohol and use our own keyboard and mouse. For desktops, we will wipe the box with alcohol, use our own keyboard, mouse and monitor and then wipe it down again before returning it to you.
We want to protect you as much as we want to protect ourselves.
Do you need to remote into a work computer?
If you need help setting up remote connection to another computer, please let us know. We have a variety of ways we can set that up for you.
We will continue to monitor news from the World Health Organization, among other sources and guidelines, and are committed to reassessing the situation and adjusting our plans accordingly.
We wish you all good health and thank you for continuing to place your trust in us. Please do not hesitate to reach out with any questions or inquiries.
Change your email address – it’s easy!
AOL is now charging for using their desktop software. You can access your email at mail.aol.com for free but using the software is going to cost you. Now is a good time to switch off of AOL. Follow the steps below to switch to a free Gmail account.
Go to Gmail.com, click on Create An Account. Create your new Gmail account. Have Gmail fetch your AOL email. You set this up in Gmail Settings. Add a signature to your Gmail account saying your address has changed. Reply to all email from the Gmail account. Eventually, you’ll be able to stop the AOL forwarding as all that will be left will be junk email. Mark all junk as Spam. Gmail has an amazing spam filter.
Voila! No one will call you Grandma/Grandpa because of your AOL email!